Tuesday, December 14, 2010

Day 84, 85, 86, and 87: Decaled Clone Troopers


I have been playing around lately with some waterslide decals on Clone Troopers, and I'm pretty happy with how they have come out.  There's a lot of tutorials out there on decal application, so I won't go into that.  I'm pretty happy with how they came out, and I am really happy with how my clone trooper army is looking.  It adds a nice amount of diversity, while still maintaining conformity.  Hope you like the figures!

Day 83 - Lego Elf Upgrade


Today was just a light customization - I really like the new Lego Elves from the Collectible Minifigure Series.  However, while I like the new longbow, I felt that this elf needed a little more of an upgrade.  So I did a little painting of a BrickForge Elven Blade and one of the new bows that they offer, as well as one of the vambrances.  I'll be doing some more upgrading to this figure, but this was just something I wanted to play with. 

Day 82 - Stormtrooper X


As I have stated before, I really love the work of Jason, more commonly known as JasBrick.  A while ago, Jason created his version of Stormtrooper X -

I wanted to replicate some of the techniques that JasBrick used in his figure - as I was analyzing the figure I saw several things he did that I wanted to replicate.  First of all I realized that he used a Tuscan Raider torso as the base, and painted everything else over that.  I also loved the gunbelt that he painted on the legs, and I loved the BrickArms Blaster Pistol proto. 

When I decided to replicate this figure, I decided to do some research.  The original image I used for Stormtrooper X comes from this source image:


While I loved JasBricks version of this figure, I did set out to intentionally do ours slightly different, as I think each figure should be a representation of the artist, and I don't want to just copy something ;)  One of the primary differences between our two figures are the colors we both chose - I used a darker brown for the base of my figure, whereas Jason used a lighter brown (which is more true to the source material).  My figures coat is a very close color to the same brown used in the Indiana Jones jacket.  I also used a more tan color for the shirt verses white.  I do still need to add the maroon shoulder pads, but aside from that I'm pretty happy.

Basically I achieved this by painting everything in layers - starting with the darker colors.  I then layered on lighter colors one at a time.  I chose to not hand-paint the legs like JasBrick because I was happy with the Lego Indiana Jones legs.

Overall, I think this figure came together very well and looks pretty good in comparison to the source material.  I have added a MMCB dark brown trenchcoat to him since this picture :)

Sunday, December 5, 2010

Day 82 - Post-Apoc Orc with Podgun


This is a continuation of my Post-Apoc Orc theme I've been working on - this figure uses a BrickArms prototype Podgun (which has been painted to match the color scheme of the armor), a BrickForge Commander Crest as a Mohawk, and an Amazing Armory GOW armor base.  As with the other figures, this one has been a continuation of learning various techniques.  I also used one of the skulls as an "earring" on the figure - this image doesn't show it as well, but it looks pretty cool in person ;)

Thanks!

Saturday, December 4, 2010

Day 81 - Post-Apoc Orc with Shield


The figure for today is a Post-Apoc Orc with shield.  I'm sure most of you will remember my figure from the Creations for Charity event - I really loved how that figure turned out, and I decided to keep going with the theme.  I had some Post-Apoc orcs that I had created quite a while ago - here are some of my favorites:


This figure is one of my favorites that I have made - I love the acid damage, especially that done on the face and arms.  Anyway, I figure these new Post-Apoc orcs with the horns on the armor are a branch off of the group I formerly called The Collective. 

With the figures, I was still interested in working on a feathering technique on the horns as well as playing with washes.  I think they turned out very well, and I'm really happy to have them in my army ;)

Day 80 - Creations for Charity - Weird War Spetsnaz Heavy Gunner


With this figure, I wanted to achieve a few things - first of all, I wanted to use my last BrickArms proto rust swirl M1919 to make a really cool figure.  I also wanted to create a figure in a new genre, and as I had already created quite a bit of post-apoc and steampunk figures, I wanted to venture into new territory (at least for myself).  As I started thinking about it, I thought I might try something for World War II, and actually make a historical figure, however the rust color of the weapon made me hesitant to do that.  I then decided, well, what about the Weird War theme - and I started playing around with some extra pieces.  For some reason, this color scheme jumped out at me to create a camo design, and it just looked like a Weird War Spetsnaz trooper to me.  I decided to add in a rust swirl BrickArms Tac Sword as well, as I thought it went well with the figure.

In terms of figure composition and creation, I obviously was playing with a technique of camouflage designs (this one turned out best of my various figures in my opinion, but the others look pretty good too ;).  Basically this was achieved by layering colors on top of one another (I used about 5 different layers), and as I did several designs I learned that it is better to do smaller designs with each subsequent layer.  If you make each subsequent layer too large, it makes the whole thing look too unorganized, and looses a lot of details.  I also used a few well placed dots of white and black to help further offset the camo pattern, which in my opinion gave it the final amount of detail that made the camo really stick out.  Hope you liked this figure as much as I did!

Thursday, December 2, 2010

Day 77, 78, and 79

So, I've been a little busy with auditions and work!  Anyway, I now am able to catch up on posting information on my figures:

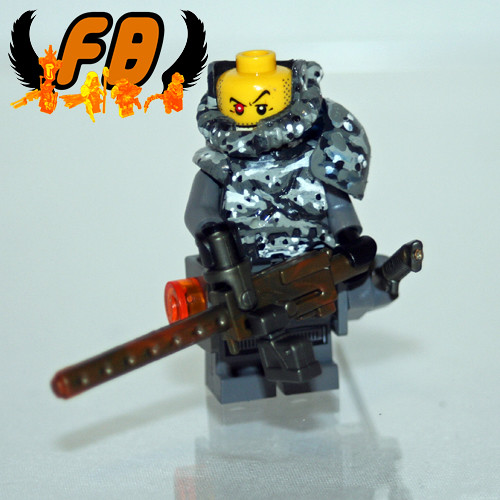
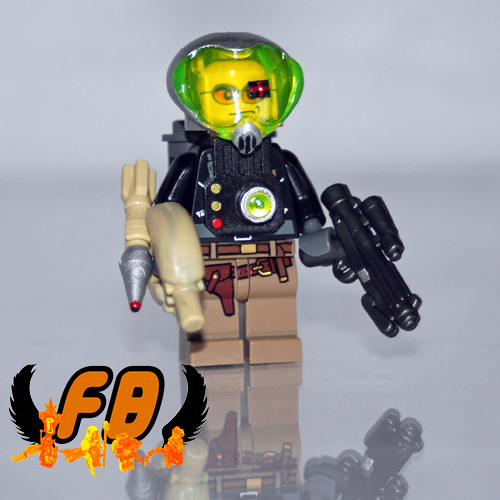
Day 79:  Creations for Charity Gravity Jumper


I had a lot of fun with this figure - as with the other Creations for Charity figures, I was playing with new ideas for the BrickArms prototypes - in this case a Podgun and E11 Blaster Rifle.  I started playing with armor options for my figure, and saw one of these jetpacks, and thought it would work well with the colors I chose.  I then started working on the buttons and the energy orb as well as the helmet.  I love using the u-clips on a figures hand to attach rockets, as it really adds firepower to a figure.  In this case, I was particularly happy with the way it turned out, because the tan podgun sits over the U-clip and it looks like the two weapons are joined together.  I almost didn't include this figure in the event because I loved how that turned out so much! 

The helmet took a little time to get right, because the curvature of the helmet messes with where the eyes of the minifigure head line up.  I think it turned out well!

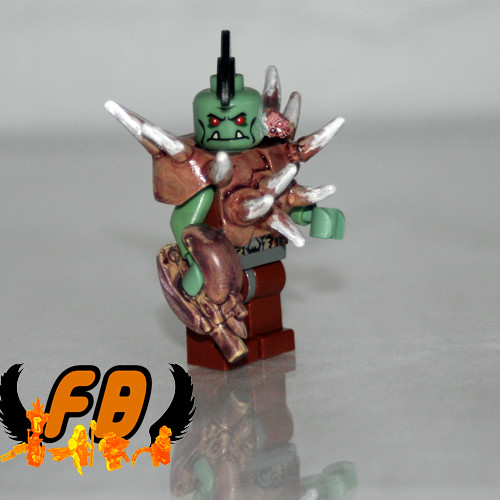
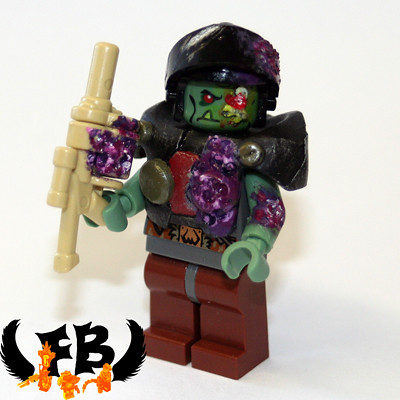
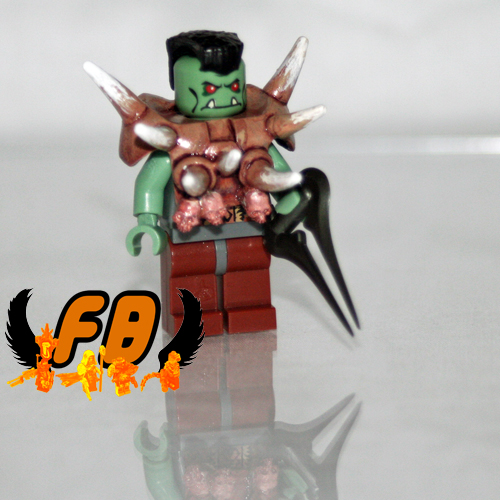
Day 78:  Post-Apoc Orc with Energy Sword


This figure follows some of the same techniques developed on the Creations for Charity figure which I blogged about before - I have a few other figures that I am working on in this genre as well - I think you'll love the leader that I developed.  This figure was primarily more playing with washes, and the feathering technique used on the bony claws on the armor - it mixes it down.  Sometimes I get it really well, and other times my hand shakes :)  It has gotten much better, and I'm really happy that I did several of these figures, because I have some other ideas for this technique!


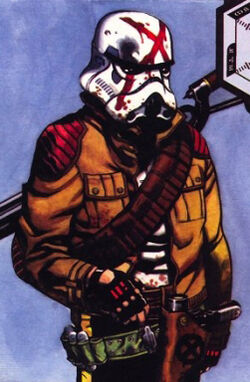
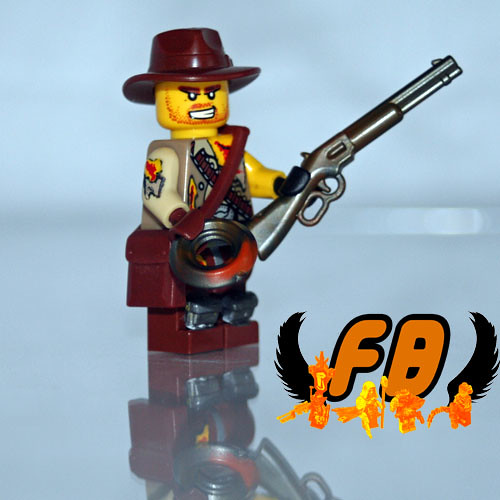
Day 77: Weird West Cowboy:


I was working on some figures, and trying to think of a neat way to include the rust/swirl BrickArms prototype chakram disc and Lever-Action rifle.  Well, as mentioned on Flickr, I'm just really jumping on the bandwagon of creating a new theme by adding "weird" to it ;) Actually, I was playing with it and thought - it doesn't fit in the western theme, nor really post-apoc, but sort of a fusion of the two, so I decided weird west worked well. I'm not sure what the differences between steampunk will be (b/c steampunk could sometimes be considered "weird" west, but oh well - I'll let the world decide that - I'm just the ... genius/crazy person... behind the idea ;)

Anyway, the point of this figure was to see how I do painting torso elements (as well as arm and leg) which represent torn clothes.  Basically this was achieved by layering one color over another (starting with the darkest and moving to the lightest).  It was also nice to have a yellow that matched the Lego figure color.  The brush I used was a standard brush, with it barely touching the figure.